如何基于 Vercel 部署 Serverless Functions?
Vercel 的 Serverless Functions 允许我们使用 Golang、Node.js、Python、Ruby 语言编写,然后可以通过 API 访问。
本文使用 Node.js 搭建 Vercel 的 Serverless Functions。
前提条件
- 一个 Vercel 账号
- 了解 Node.js 和 TypeScript 基础知识
操作步骤
Step 1:新建项目目录
1
$ mkdir vercel-serverless-functions
Step 2:安装 Vercel CLI
Vercel 提供了 CLI,可以方便地部署和使用 Serverless Functions:
1
$ npm i -g vercel
Step 3:安装依赖包
1
2
3
4
5
# 切换到 vercel-serverless-functions 目录
$ cd vercel-serverless-functions

# 安装依赖包
$ npm i -D @types/node@16 typescript @vercel/node
@types/node@16:提供 Node.js API 的代码提示、类型检查和代码补全等功能
typescript:TypeScript 编译器,将 TypeScript 编译为 JavaScript
@vercel/node:Vercel 团队提供的Node.js 函数的工具和类型定义,在 Vercel 部署 Node.js 无服务器函数时使用
Step 4:生成 tsconfig.json 文件
1
2
3
4
5
6
# 使用 npx 命令生成 tsconfig.json 文件
$ npx tsc --int

# 使用 l 命令可查看到名为 tsconfig.json 的文件已生成
$ l
api/  node_modules/  tsconfig.json
Step 5:新建 api 目录并创建 app.js 文件
1
$ mkdir api
使用 vim api/app.js 命令编辑文件并保存:
1
2
3
4
5
6
import type { VercelRequest, VercelResponse } from '@vercel/node'

export default (request: VercelRequest, response: VercelResponse) => {
  const { name } = request.query
  response.status(200).send(`Hello ${name}!`)
}
Step 6:本地启动服务
键入 vercel dev 命令启动:
1
2
3
4
5
6
7
8
9
10
11
12
13
14
15
16
$ vercel dev
Vercel CLI 33.0.0
? Set up and develop “~/project/vercel-serverless-functions”? [Y/n] y
? Which scope should contain your project? Harrison Wang's projects
? Link to existing project? [y/N] n
? What’s your project’s name? vercel-serverless-functions
? In which directory is your code located? ./
Local settings detected in vercel.json:
No framework detected. Default Project Settings:
- Build Command: `npm run vercel-build` or `npm run build`
- Development Command: None
- Install Command: `yarn install`, `pnpm install`, `npm install`, or `bun install`
- Output Directory: `public` if it exists, or `.`
? Want to modify these settings? [y/N] n
🔗  Linked to harrison-wangs-projects/vercel-serverless-functions (created .vercel)
> Ready! Available at http://localhost:3000
Step 7:本地服务测试
浏览器访问 http://localhost:3000/api/app?name=Vercel 接口,可以看到成功返回“Hello Vercel!”消息:

Step 8:发布到 Vercel
1
2
3
4
$ vercel --prod
Vercel CLI 33.0.0
??  Inspect: https://vercel.com/harrison-wangs-projects/vercel-serverless-functions/4WR38JWoD5pC8UDQ2B8LmRhiueWx [1s]
✅  Production: https://vercel-serverless-functions-83y10f6fk-harrison-wangs-projects.vercel.app [1s]
执行完成后,可以看到 Vercel 给我们生成了一个默认域名 https://vercel-serverless-functions-83y10f6fk-harrison-wangs-projects.vercel.app,我们将参数 name 拼接上,使用浏览器访问 https://vercel-serverless-functions-bay.vercel.app/api/app?name=GitHub 接口,可以看到成功返回“Hello GitHub!”消息:

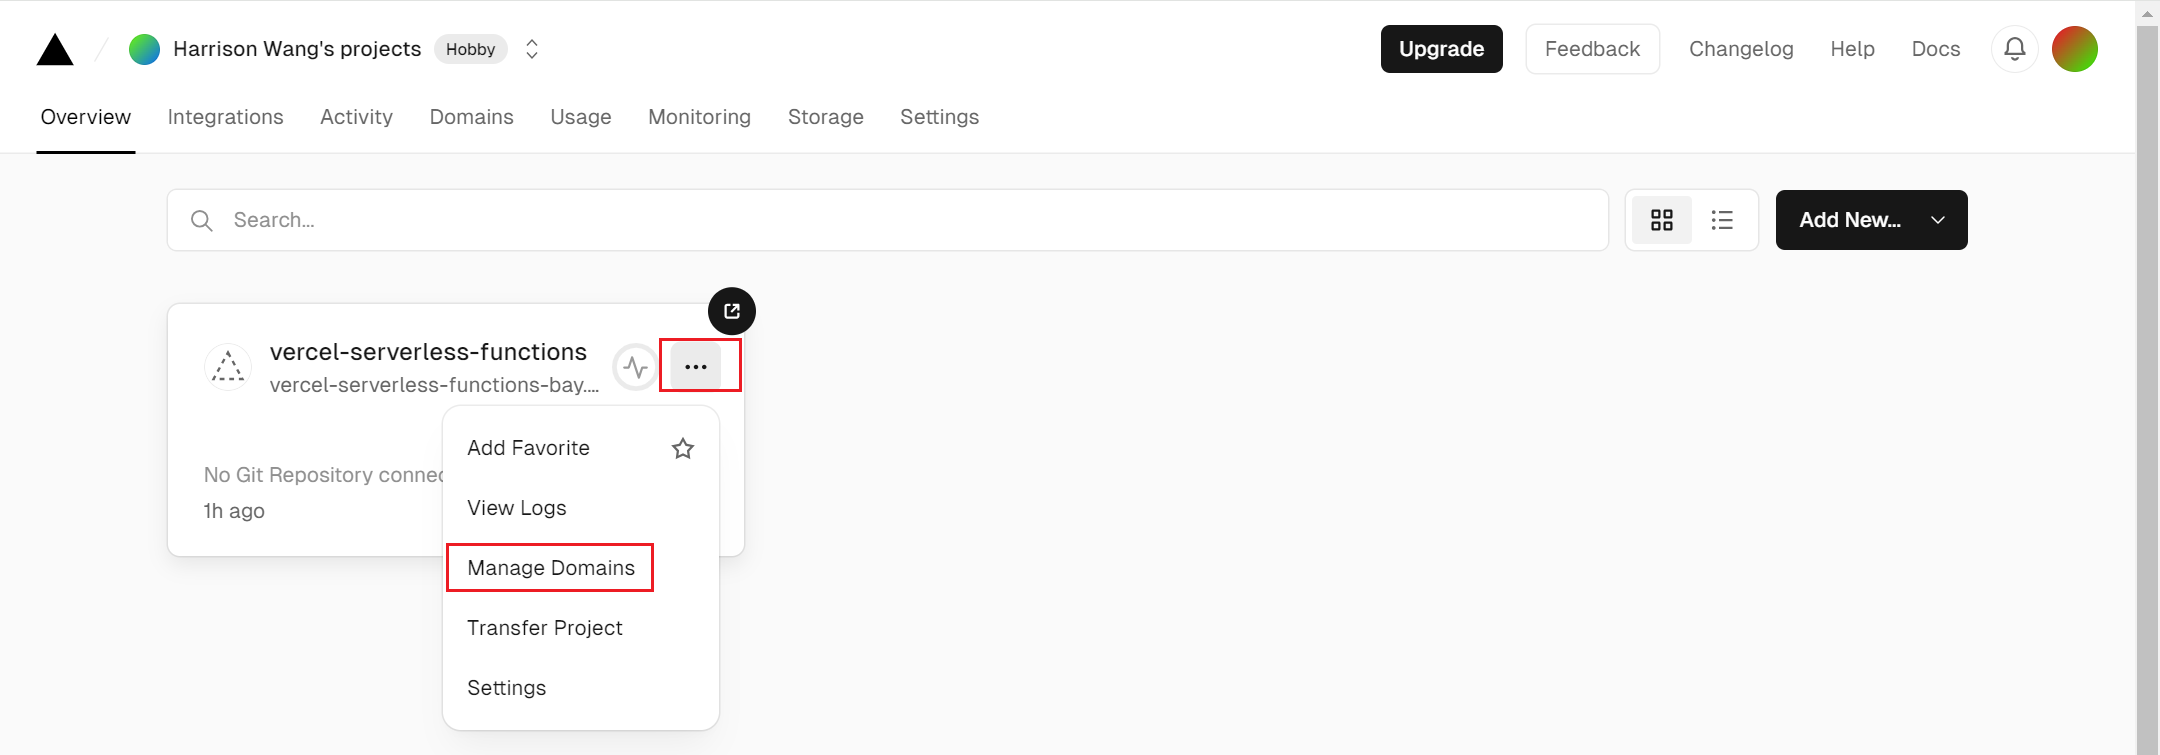
Step 9:绑定自定义域名
打开 Vercel 地址,选中 vercel-serverless-functions 项目,点击 Manage Domains:
添加自定义域名 vercel.xiaowangye.org:
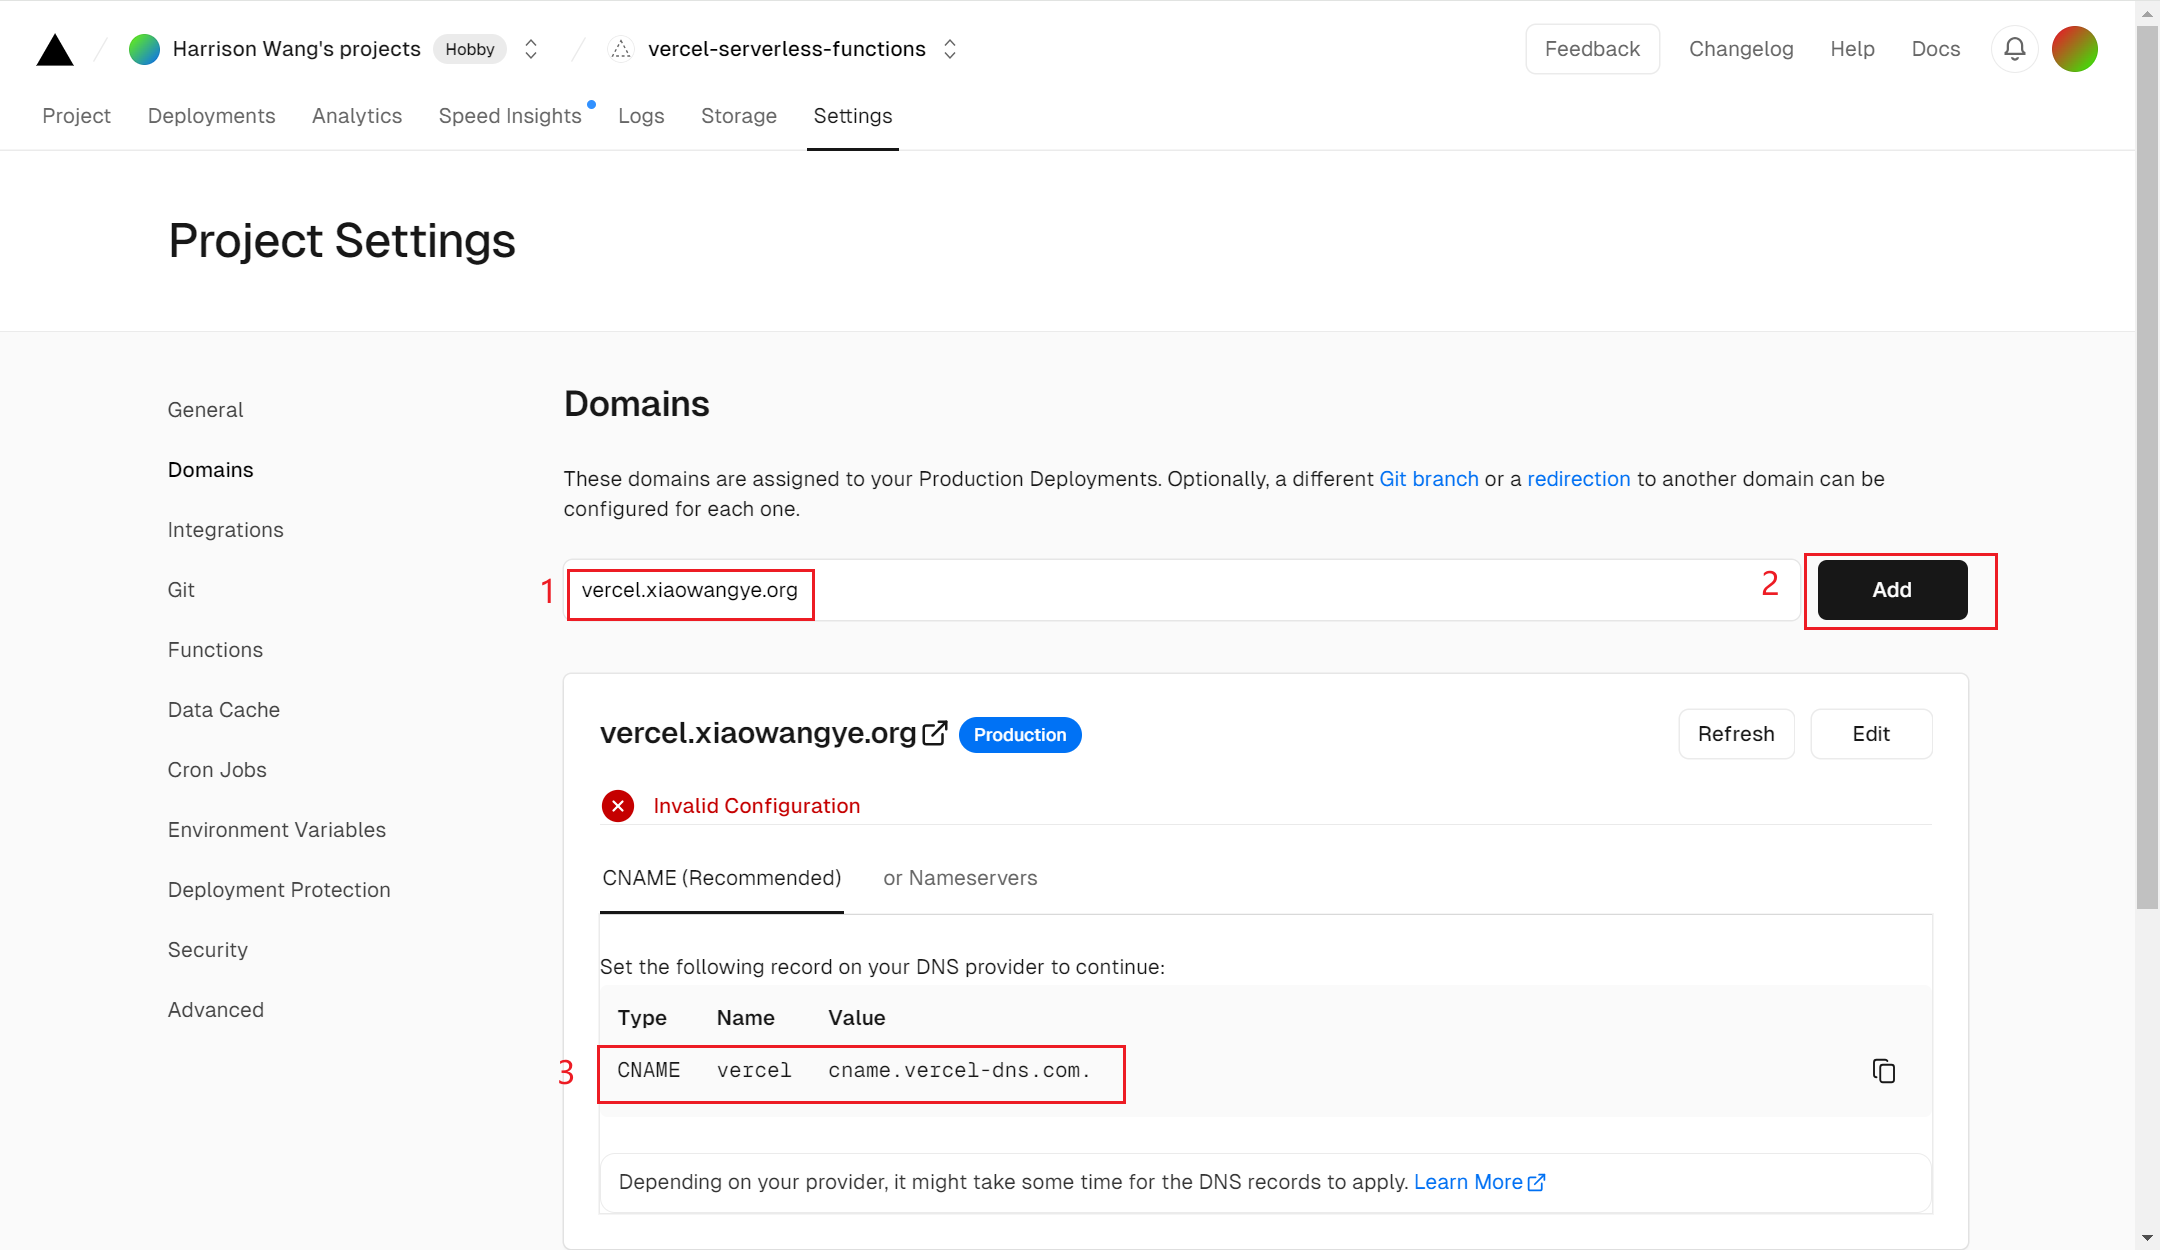
然后我们将 Vercel 提供的 CNAME 记录,添加到 Cloudflare DNS 记录:
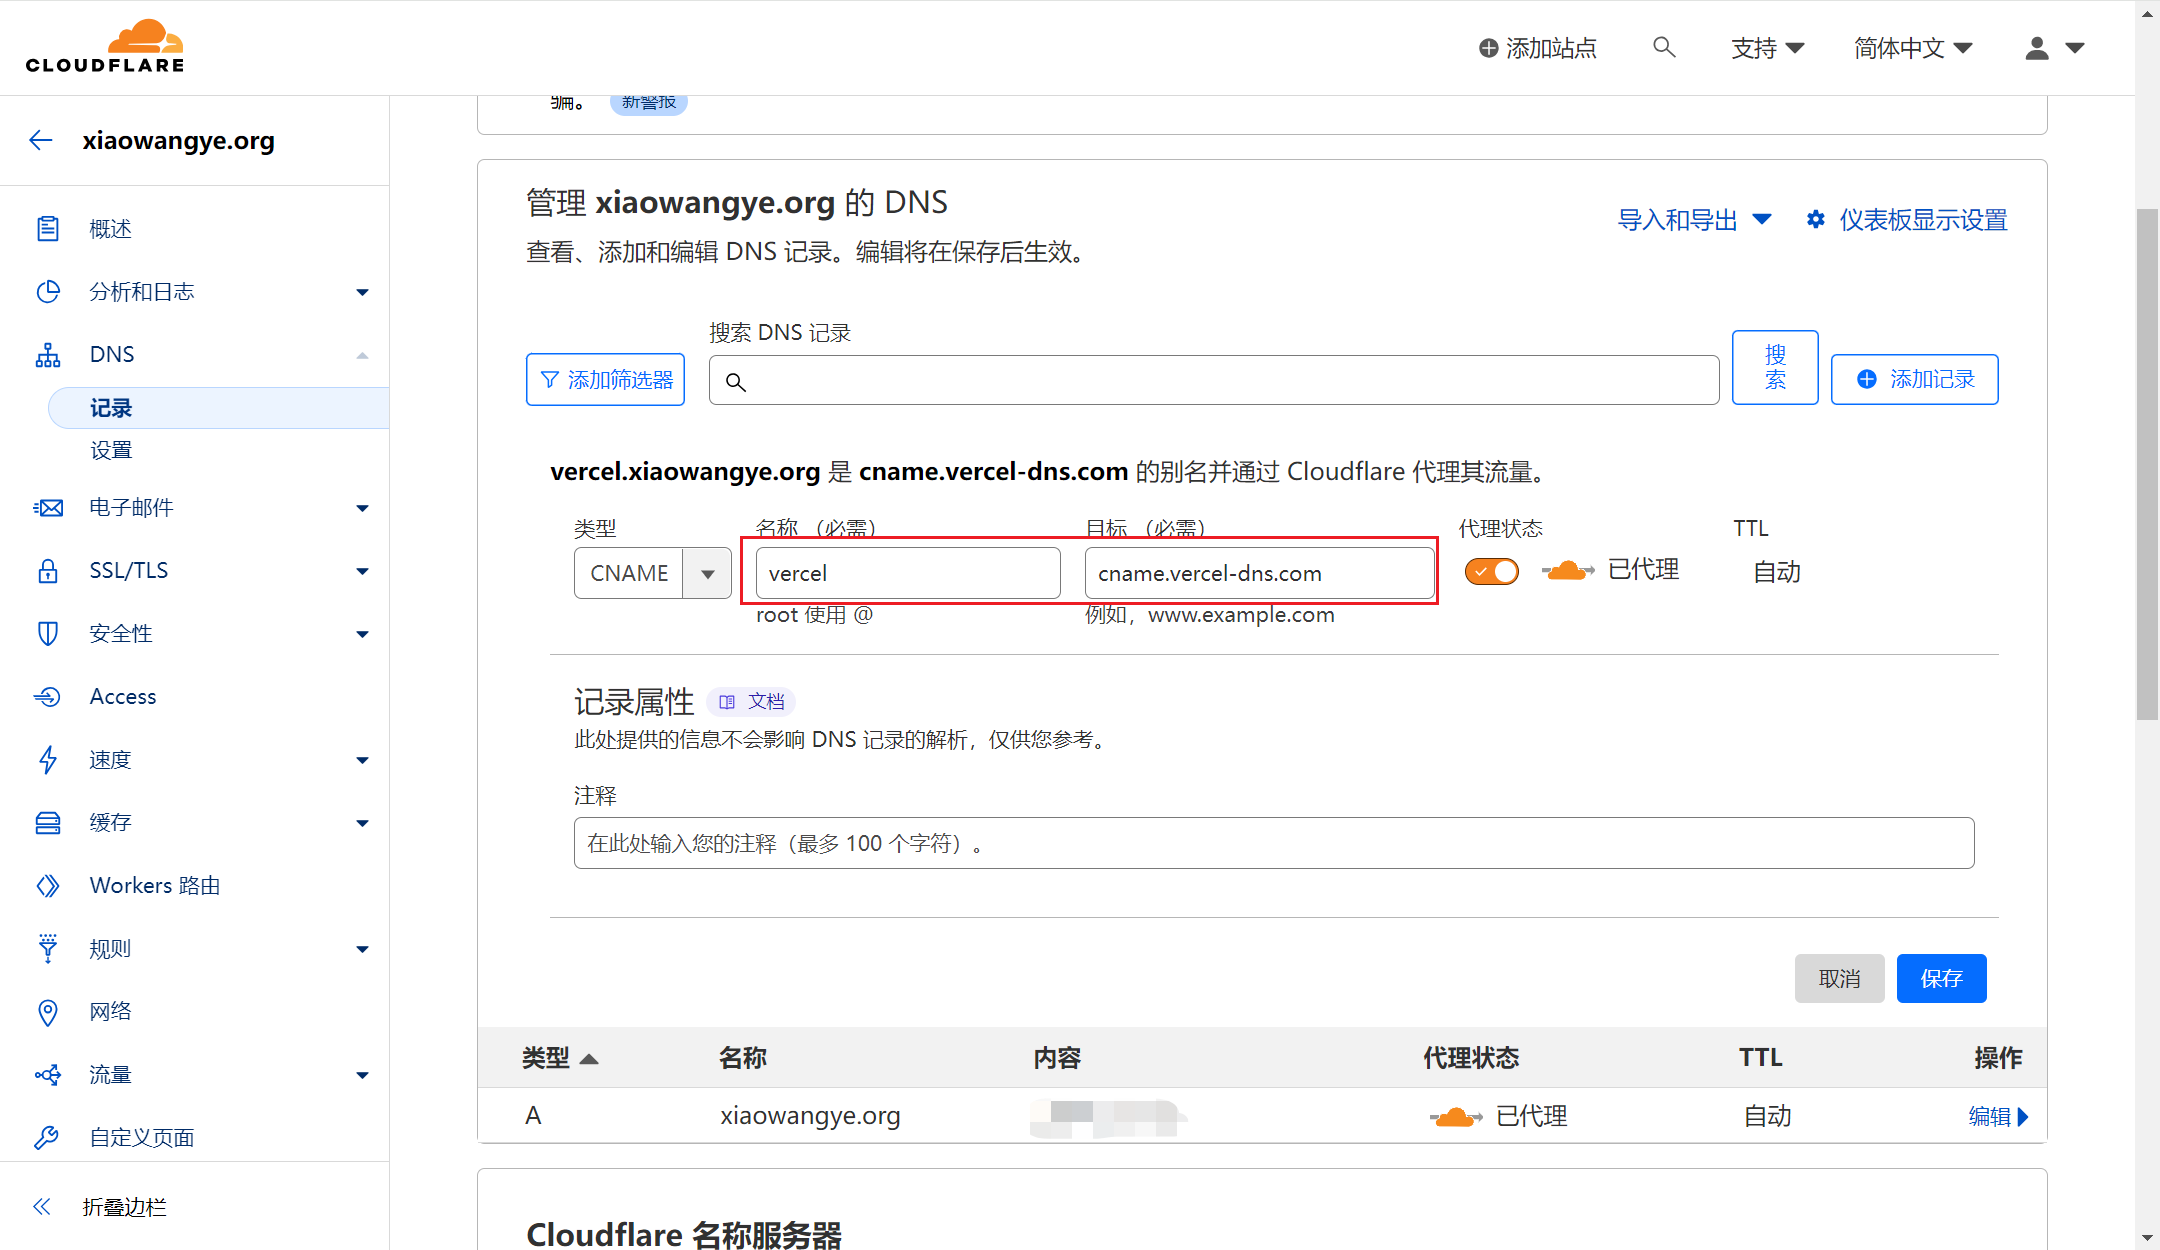
DNS 记录设置完成后,我们可通过地址 https://vercel.xiaowangye.org/api/app?name=world 访问到接口:
1
2
$ curl https://vercel.xiaowangye.org/api/app?name=world
Hello world!
出现
DNS_PROBE_FINISHED_NXDOMAIN错误,是因为 DNS 同步到国内需要时间,请稍等一个小时后重试。
总结
Vercel Serverless Functions 适用于构建轻量级、可伸缩、易于部署的服务和功能,特别适合快速原型开发和构建无服务器应用。
本文示例仓库地址:https://github.com/HarrisonWang/vercel-serverless-functions.git